
Bhattacharya Lab Dot Blot Assay Protocol
Below based on Bhattacharya Lab Protocol written by Pinky Liau and modified by Erin Chille and Stephanie D’Elia.
Goal:
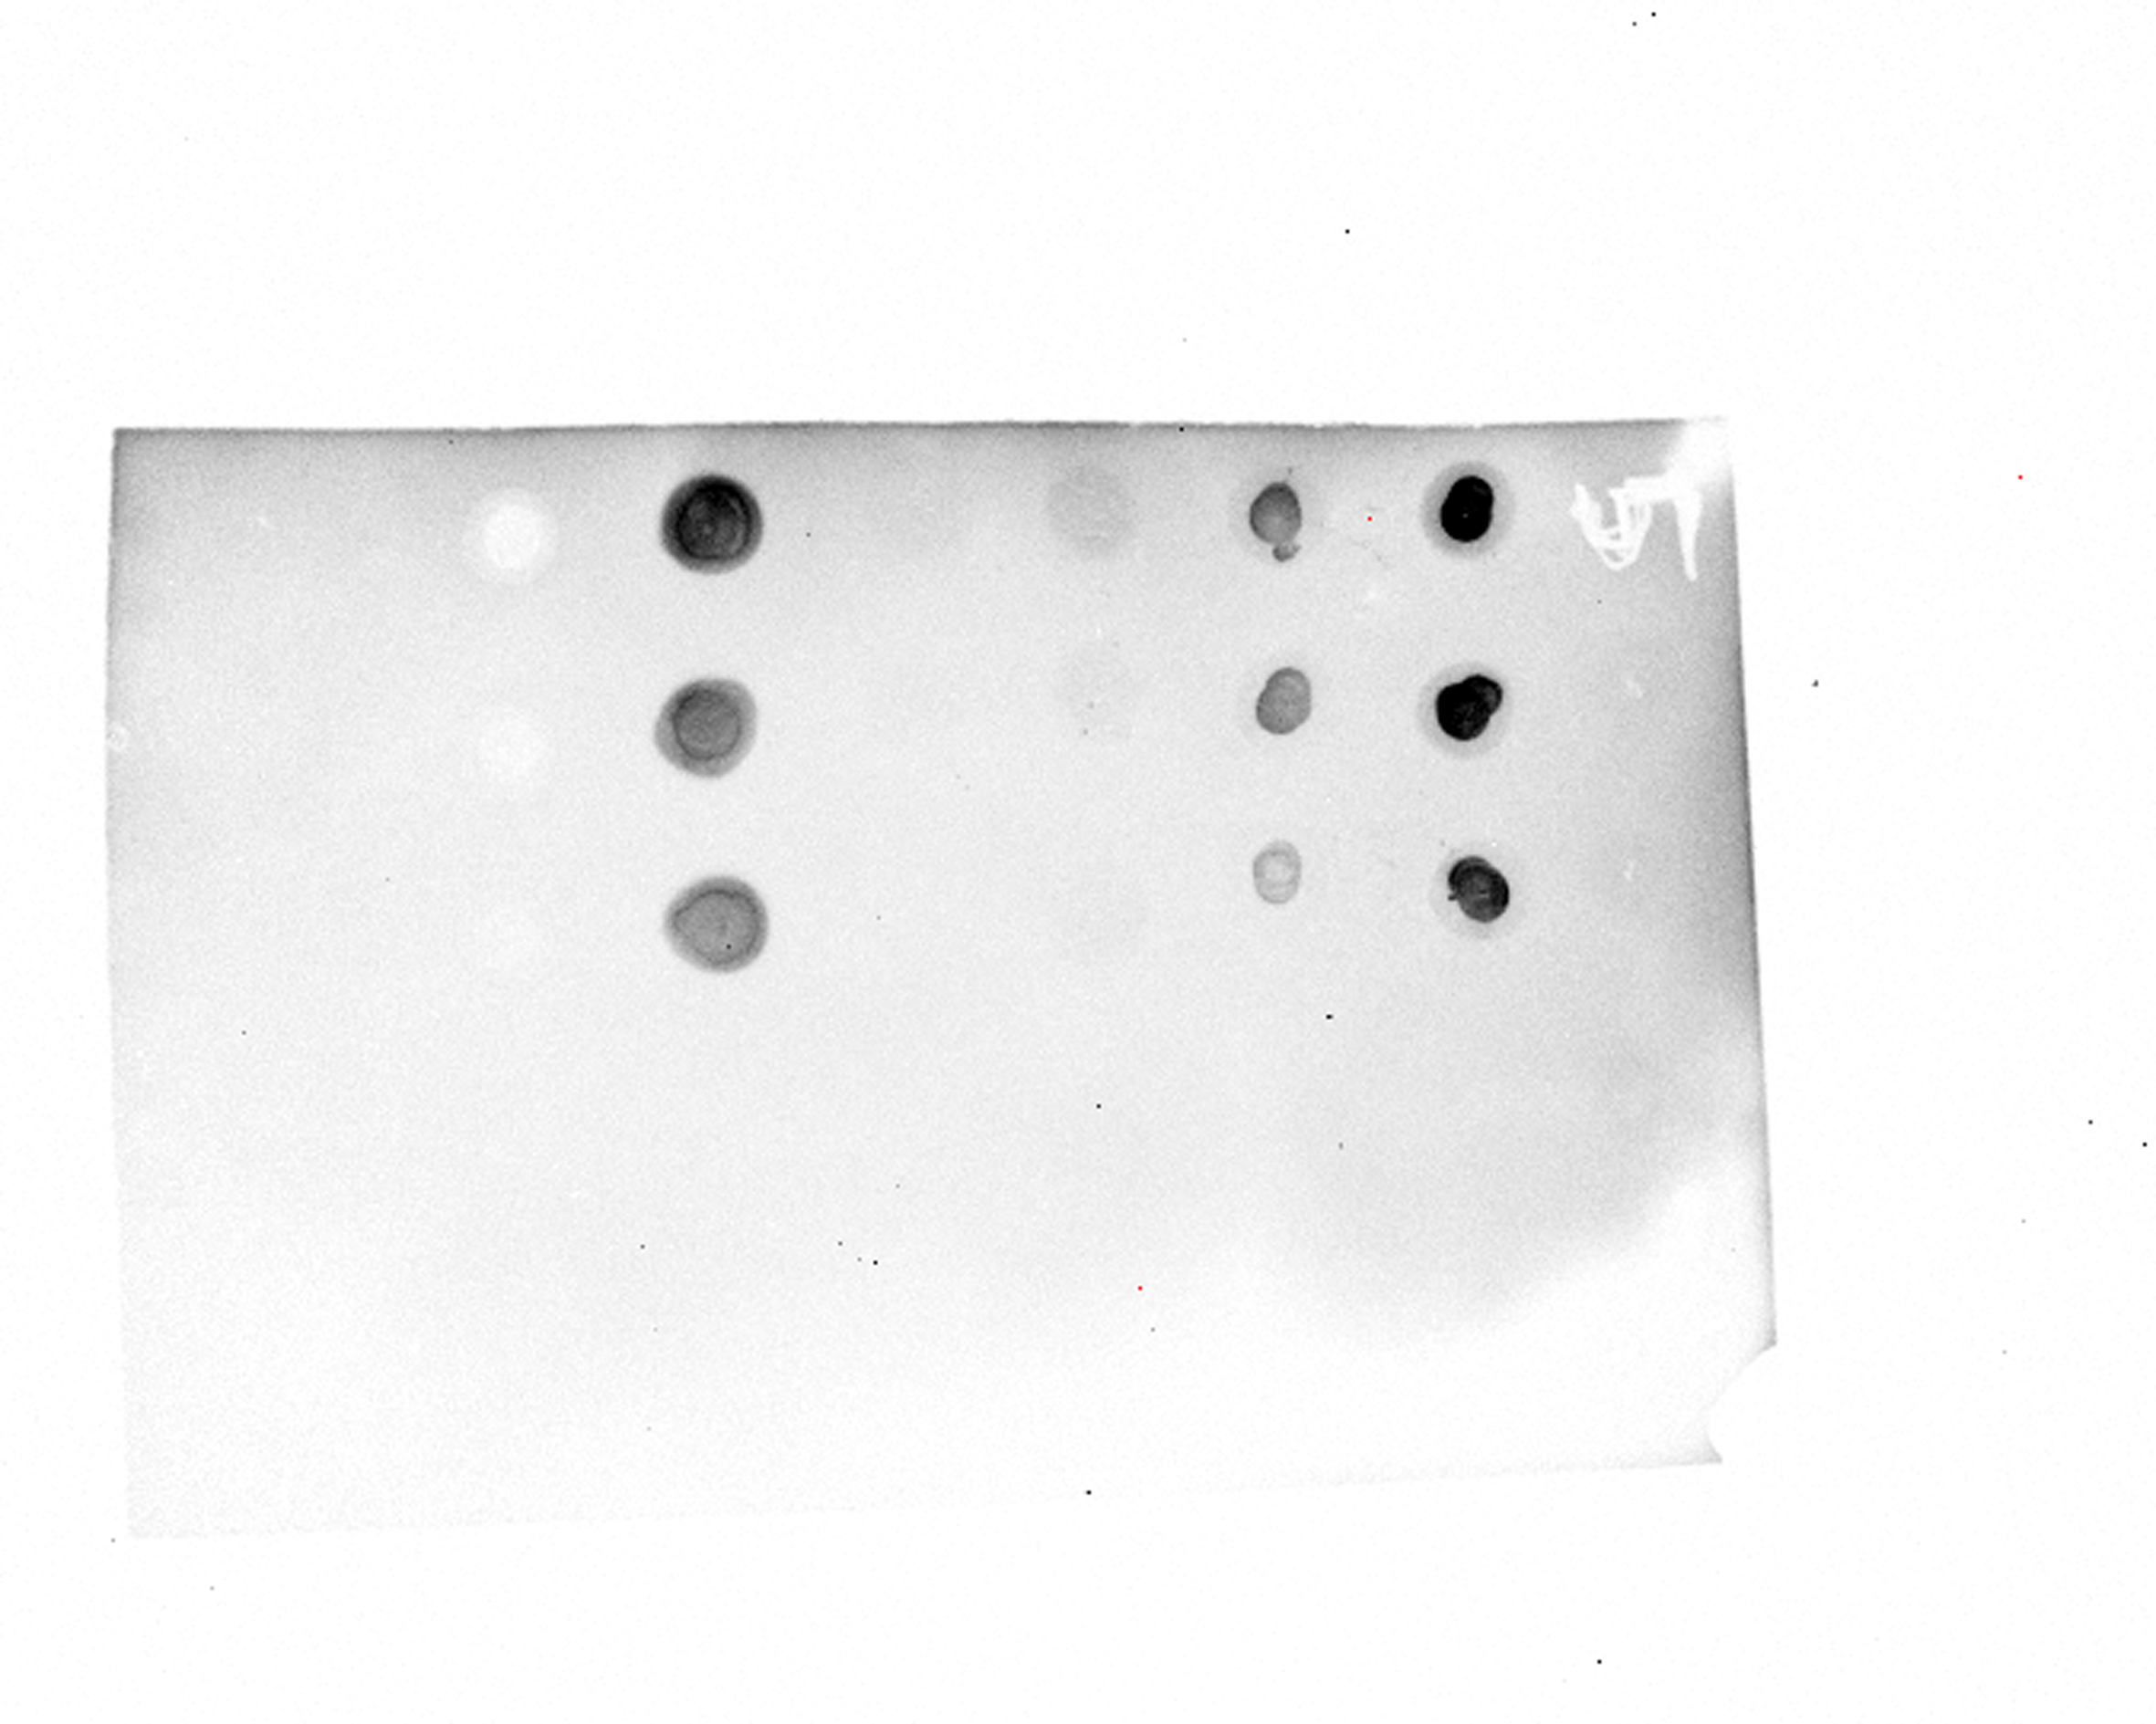
Dot blot assays are used to qualitatively compare the concentrations of specific, targeted proteins in a coral tissue sample. For example, we will be using Dot Blot assays to determine if a protein is present at higher or lower concentrations in stressed versus healthy corals. The darker the dot is, the higher the concentration of the targeted protein (Fig. 1). Proteins are targeted from the pool of extracted proteins using monoclonal antibodies that we purchased from ABClonal. These specific proteins were targeted due to their tendency for up- or down-regulation under heat stress, as observed by Bhattacharya Lab PhD Candidate, Amanda williams.
Materials:
- Nitrocellulose membrane
- Primary Antibodies from ABclonal
- NCAM2 Rabbit pAb – 5µL received, only 2 µL left
- P2RX4 Rabbit pAb – 5µL received, only 2 µL left
- UCP2 Rabbit pAb – 5µL received, only 2 µL left
- VPS18 Rabbit mAb
- GRB10 Rabbit pAb
- AADAC Rabbit pAb
- Calcoco2 Rabbit pAb
- NNT Rabbit pAb
- SMPD1/ASM Rabbit pAb
- IDH2 Rabbit mAb
- Secondary Antibody
- HRP Goat Anti-Rabbit IgG (H+L)
- Tween20
- Tris-HCl
- NaCl
- SDS
- TBS
- TBS-Tween (TBS-T)
- BSA or non-fat dried milk powder
- Small trays for incubating membranes
- Use empty tip box lids (clean)
- Novex Chemiluminescent Substrates
- Protein Lysis Buffer
- Thumb drive to store images
Buffer recipes:
Protein Lysis Buffer (100 mL)
- 50 mM of Tris-HCl – 5 mL
- 150 mM of NaCl – 0.8766 g
- 1% SDS – 1 g
- 1 cOmplete mini EDTA-free tablets per 10 mL of buffer
- Add one tab for 10 mL
- DI add up to 100 mL
TBS (2 Liters)
- 20 mM of Tris-HCl pH 7.4 – 40 mL
- 150 mM of NaCl – 17.53 g
- DI – add up to 2 L
Washing Buffer: TBS-T (1 Liter)
Store in refrigeration (~5℃)
- 0.05% of Tween 20 in TBS – 0.5 mL into 1 L of TBS (this is made from the TBS above, additional TBS is not needed)
- 1x Tris Buffered Saline Tween 20
Blocking Buffer: Dried Milk Powder in TBS-T (1 Liter)
This solution doesn’t keep, is for one use (day) only. Can keep in refrigeration between steps.
- 5% solution of dried milk powder in TBS-T – 50 g in 1 L of TBS-T or 25 g in 500 mL
- Calculate the volume of buffer needed before making so we don’t waste the milk powder/BSA
- 1 L or even 500 mL is WAY too much. Read through the protocol and calculate exactly how many mL is required for the day and make that amount + a little more. - BSA or blotting grade dried milk powder is quite pricey! Our neighbors who do a lot of western blots said they use grocery store bought nonfat dried milk powder. When we run out of what we have, next time just go buy it cheap!
- Calculate the volume of buffer needed before making so we don’t waste the milk powder/BSA
- If using 10X BSA in TBS: this is 10% so if we make 5%, it uses up too much of the stock. Maybe experiment with 1-3%? this was expensive.. skip this next time
Protocol:
Part 1: Protein Extraction
- Prepare protein lysis buffer.
- Dissolve 1 complete mini EDTA-free tablet in 10 mL of buffer.
- Chill mortar and pestle on ice ~ 5-10 minutes.
- Chill buffer + dissolved tablet buffer on ice for ~ 10 minutes.
a. The buffer will turn cloudy.
b. Store extra mixed buffer in fridge (4 C). - Grind 1 gram of coral nubbin in a mortar on ice with 100 µL of lysis buffer.
- Transfer the ground sample + buffer into a 2 mL Eppendorf tube.
- Use an additional 50 µL of lysis buffer to “wash” the mortar.
- Transfer that 50 µL to the same tube for a total of 150 µL of lysis volume.
- Vortex the samples for 1 minute.
- Incubate on ice for 30 minutes.
- Centrifuge at 10,000 rcf for 10 minutes.
- Pipet supernatant out (~150 µL) into a clean Eppendorf tube.
- Quantify protein concentration with Qubit Protein Assay (post on how to do this later).
- Do a serial dilution of protein extract (2 – 4 dilutions should be good).
a. Dilute in lysis buffer or TRIS or DI.
Part 2: Dot Blot Assay
- Prepare all buffers before starting. Except for the Blocking Buffer, this can be done the day before.
a. Use clean autoclaved glassware for prep, but buffers do not need to be autoclaved.
b. Prep JUST ENOUGH of BSA for the day. - Cut nitrocellulose membrane in half if necessary.
- Label the top corner of membrane with pencil to indicate antibody being tested.
- Slowly pipet 2-5 µL of extracted protein sample onto nitrocellulose membrane.
a. On 3/11/22 and 3/15/22 we did 3µL.
b. Remember to include a negative control- can use lysis buffer. - Let the membrane dry.
- Block the membrane with ~ 15 mL of 5% BSA in TBS-T for 1 hour at room temperature.
a. Always pour solutions next to membrane in tray, not directly on, let run over.
b. Keep membrane wet at all times.
c. Gentle shaker at 60-80 rpm.
d. Cover with plastic wrap. - While waiting, dilute primary antibodies according to optimal dilution as indicated by the manufacturer.
a. Dilute in BSA in TBS-T. i. 10 µL antibody into 9990 µL of BSA/TBS-T.
ii. Ensure pipette tip is empty by pipetting up and down.
iii. Invert gently to mix.
b. Need 10 mL of diluted antibodies per tray. - Decant the blocking buffer.
- Incubate membrane with diluted primary antibody (1:1000) for 1 hour at room temperature on a gentle shaker or rocker.
a. Alternatively, overnight at 4 C.
b. 60-80 rpm. - Decant the antibody solution into its labeled 15 mL falcon tube.
a. Store in – 20 C.
b. Alternatively, store with 0.02 – 0.05% sodium azide. - Wash the membrane 3 times with TBS-T.
a. ~15 mL per tray.
b. Each wash ~ 10 minutes. - Incubate membrane with secondary antibody (1:5000), diluted according to manufacturer’s instructions in BSA in TBS-T for 1 hour at RT.
a. Dilution: (1:5000) = 2 uL into 9998 uL of BSA/TBS-T.
b. Gentle agitation with shaker 60 - 80 rpm. - Decant solution.
- Wash membrane 4 times with TBS-T. For the first three times, do 10 minutes, then for the last time do 5 minutes. @ith multiple membranes, leave them in this last wash until ready for ECL. It is crucial to remove any unbound antibodies!
a. During the last wash incubation, prep 1 mL of ECL by mixing equal parts of reagent A and B for each membrane.
i. Prep this one and incubate ECL one membrane at a time.
ii. 0.5 mL of A + 0.5 mL of B (order doesn’t matter). - Place membrane on top of a piece of saran wrap.
- Pipet 1 mL of ECL mixture onto the membrane, dropping evenly around it.
- Spread ECL evenly across the membrane by closing and opening saran wrap and incubate for 1 minute see Novex ECL manual
- Blot off excess liquid onto paper towel or kimwipe.
- Protect membrane with saran wrap so it doesn’t dry out.
- Finally, Image the blot with Cohick lab’s imager – Invitrogen iBright 1500. The best image with exposure set to at least 5-10 minutes. Do NOT use gloves on imager’s touchscreen!! If needed, go back and see exposure time, see “Image Information”. While it is imaging, you can prep another 1 mL of ECL for another membrane (Step 16), and repeat the last 5 steps.
References:
- ABClonal antibodies fact sheet
- Novex ECL reagents
- Thermo Fisher Western Blot protocol
- ABCam Protocol
- Novete InBio Protocol
- BSA Blocking Buffer calculator
- TBS-T calculator
- Antibody Dilution Calculator
- Fenoll et al., 1997. Dot Blot Assay for the Serotyping of Pneumococci.